Sunday, July 29, 2012

Evolving Dolls and Tassel Video

It is so interesting to watch a sculpted doll develop, especially those done with air dry clay. The process of sanding, adding clay, sanding again, and detailing often yield a completely different face. Here is my lady from the other day (this doll is sculpted with Premix):


I re-sculpted the lips probably about five times. It is a joyfully painful learning process! The little polymer clay fairy's armature is ready...actually the torso and legs are complete too but I haven't taken pictures of that yet.


Tassel videos are coming along and I don't thing are going to need much editing. they look pretty good, for what I am trying to do right now anyway!

It is a process, and let me tell you at eight months pregnant I am never sure what day things are going to get done, mostly due to the fatigue factor. Thanks to all who are patiently waiting for me to get it together!

Cheers!

Wednesday, July 18, 2012

Tassel Topper and OOAK Heads on Sticks! What a Start to the Day!

Well the itch is there for the scratching. I am working on the tassel site...if you have ever built an information based web site with all the bells and whistles you know it takes time. Today I sanding down and am painting one of my own wood tassel forms that I put together. One of the things I am consistently asked is "where do you find the wooden tops for making tassels?" Having made tassels for many years I have some resources, and have had a number turned on my own. However, who wants to pay 5, 10, or even 20 dollars for a wood piece that is going to be covered? The answer is to put together the myriad shapes that you can find right in your own chain craft stores, add a litle clay, sand, paint, and be on your way to a gorgeous piece of art.


Gosh it is soooooooooo hot this summer. It is going to take forever for the paint to dry in the humidity, I always spray chemicals including paint in the garage, because no one likes or needs the fumes.

As ususal the itch to make dolls is also there needing to be scratched. So here are my too new girls. I just love fantasizing about their hair, costumes, etc. The only thing I can't decide on is a color scheme for the larger doll. Any thoughts?


Well back out the sauna/garage to check on the form.

Cheers!!!

Wednesday, July 11, 2012

Tassel for Tutorial: Second Color Version

Hi all! Here is the white tassel that will be featured on the video. I will be posting free instructions for making the Swarovski Rivoli crystal embellishment on the tassel form, but it is optional.


See you there! Cheers!

Tuesday, July 10, 2012

A Tasselling We Go

Time to tassel! Let the fibers fly! We are going into the video studio today to work on video tutorials...I will be teaching how to make this very simple but elegant tassel. This is intended to be your foundation piece, because once you have mastered the techniques required to make this tassel, you can then do just about anything with some effort and practice.


Don't worry! Your tassel does not have to be pink! Actually the tassel in the video is white. I just made a pink one to use up some pink crochet cotton I had. After all, making tassels, especially "practice" pieces, doesn't have to be expensive-part of the practicality of this art form is is gives you a chance to use up some of your stash of fibers. In future tutorials, we will be doing just that, and dyeing our old fibers to make a whole new work of art.

Don't worry about the wood form either. We will address that in the video.

Don't forget to stop by http://www.howtomaketassels.com to see this unfold!

Cheers!

Monday, July 9, 2012

Ostrich Egg and Ribbon Fairy Finished

The ostrich egg/ribbon fairy is finished! Well that is what I am calling it anyway. Finished, that is. I think anything else added at this point 1)might just be overkill and 2) increases the chance that either the egg or the doll will be dropped and broken. I have already pushed my luck with these two fragile little works...So the photos have been taken, and it is time to do some tasselling...and some sculpting too...have to keep those skills sharp and always seek to improve.

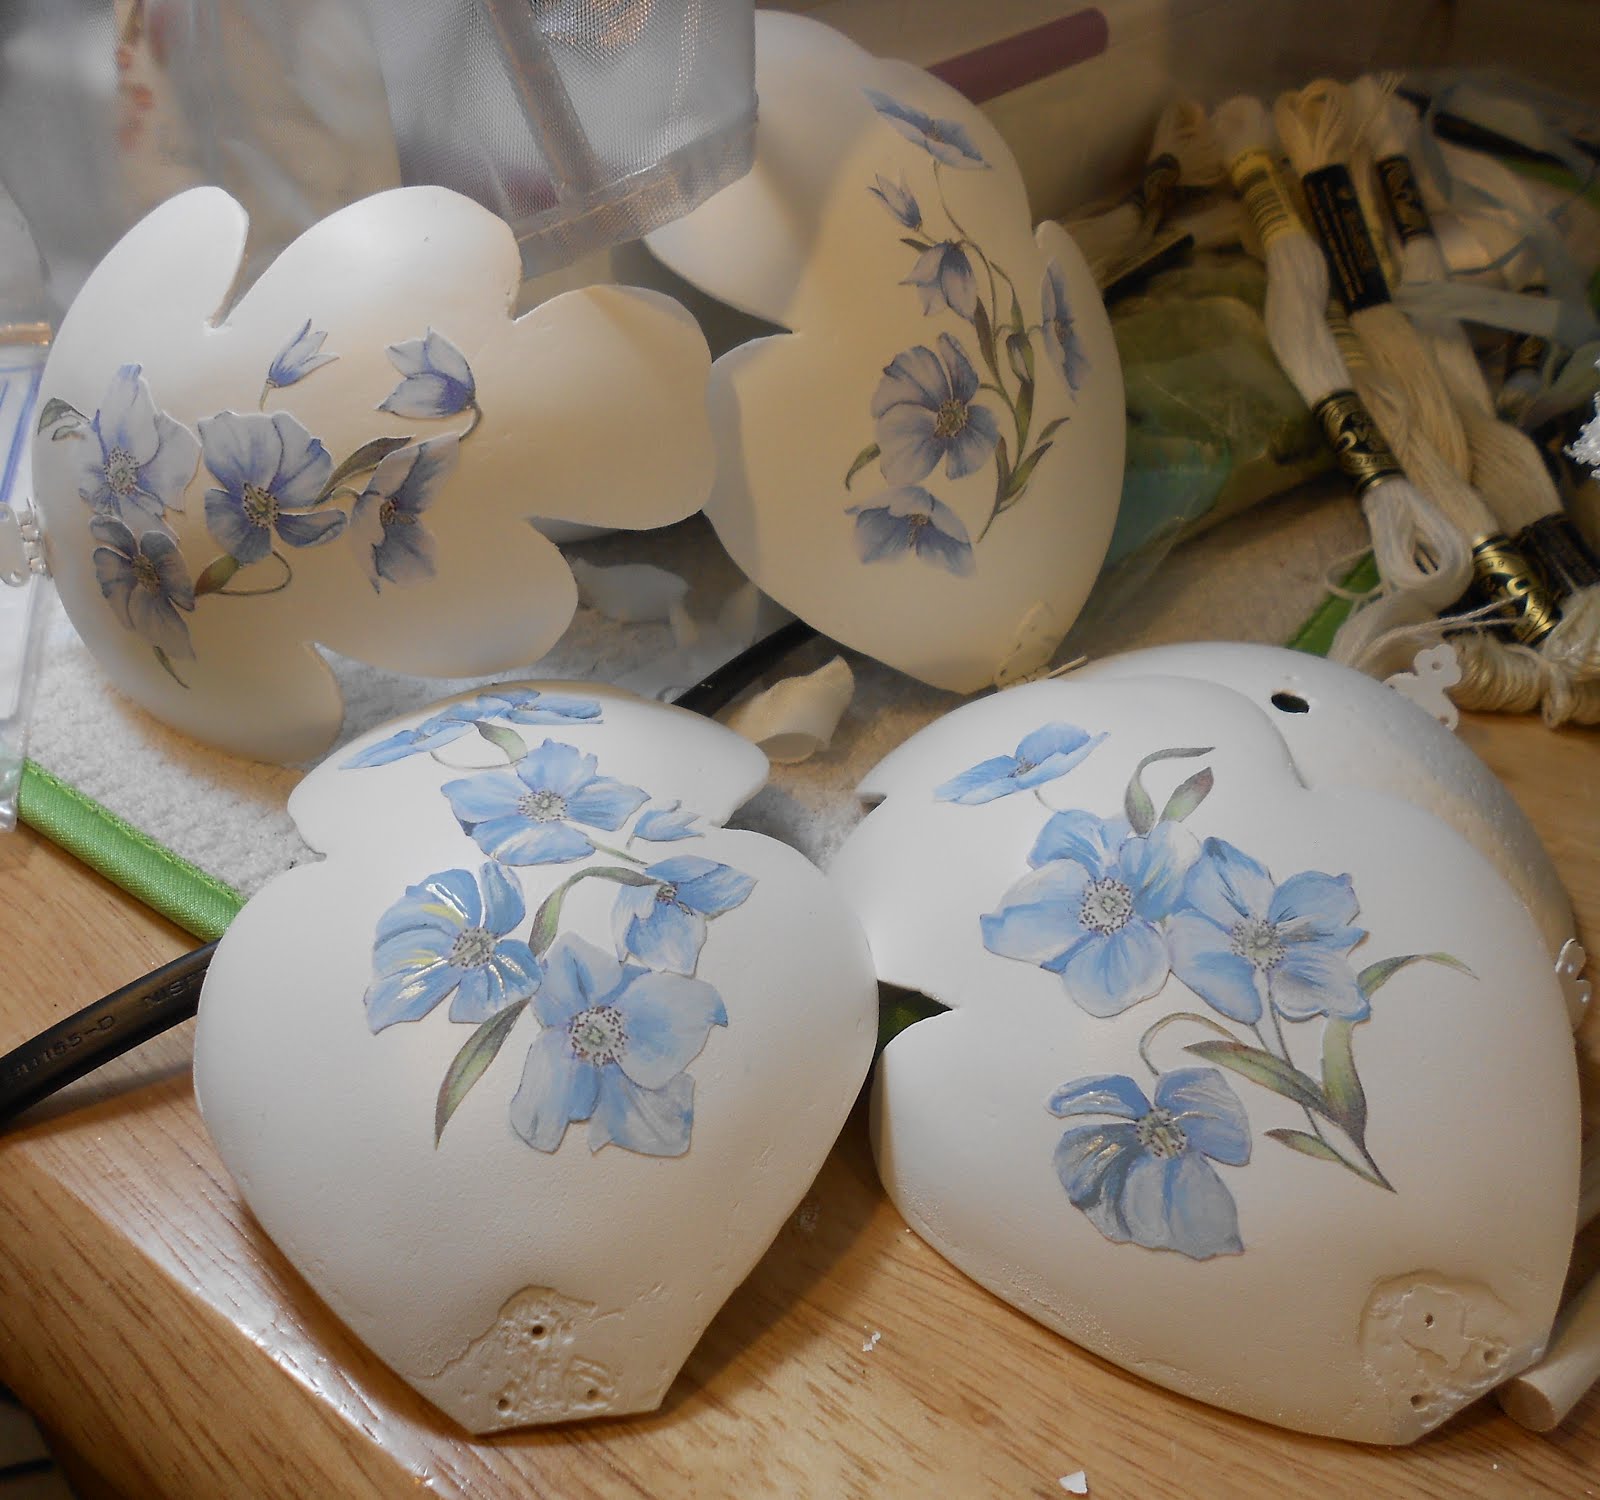
After the outsides of the ostrich egg panels were coated with paper clay, sanded, then covered with modelling paste and sanded (sanding alone usurped the better part of a creative work day), it was time to decoupage. The blue flowers were a decal, but I decided I wanted to have four different panel designs. At first I cut them out and rearranged them to make four separate decals on decal paper, but the acrylic sealer terribly distorted the color. So, I decided to print them and use them as decoupage...I used UV archival acrylic sealer from Krylon. I like this sealer a lot because there is no color distortion, you can spray it over glitter, crystals, or just about anything. It is a bit scary when it is first applied because it looks drippy and runny and looks like it has just ruined your precious art work. However, as it dries, it reveals everything exactly as it was - with NO FINISH - which is often what I am looking for with my projects because often even a matte sealer leaves an undesirable sheen if you do not desire one.

Alas, the colors of the flowers were wrong anyway, so I simply painted over them in a more favorable blue.


After the flowers were painted and decoupaged, I added Swarovski crystals, glitter, and ivory micro beads:


Here is how the project looked in progress of putting it all together:


Then the dilemma of adding something to hold all of the panels together in a closed position. I adressed this using power magnets epoxied to two leaf findings and a crystal topper.


Almost finished...


Some ribbon and crystal accents, white silk cord, and micro beads and voila! She is finished.


Time to add in the ribbon fairy:


where she was meant to be


on her ribbon adorned throne


This was a very ambitious project...I am not sure I want to make every project this much of a time commitment, especially because it took away from the tassel web site way too much.

Well just a couple of more pictures of the ribbon work:


and an interim project I did for my little buddy:


Tomorrow morning I will be making the tassel that I will be teaching on the web site. I can't wait to recapture the momentum I had a few months ago with the tassel web site.

Till tomorrow, in some virtual form,

Cheers!


Monday, July 2, 2012

Two Additional Pictures

Here are the egg panels for the ostrich egg...I noticed on yesterday's post I only had captured two of the four panels. Also, the outsides are almost done as of now and I am getting ready to spray paint them.
Cheers!

Sunday, July 1, 2012

I am just about finished with this latest block of projects. I tried to post the pictures in chronological order but I guess it's just going to do what it wants...but they are all here! Libelle, a project by Sherry Goshon, was a really fun project to do, and since I am always trying to incorporate things I love to do I added two butterflies carved out of a rhea egg shell and adorned with glitter, crystals, and organza fabric. The three tiny little butterflies are made of paper and attached with wire. She has Swarovski crystals in her hair; her hair is made of some exquisite yarn I bought at Magpie Yarns. I added some blending filament and some gold yarn I had previously purchased also. I really recommend yarns from, for example, Tilli Tomas for art doll hair. They are beautifully dyed, and many have beads or sequins. Libelle's sleeves are silk rose petals, and the dragonfly wings were made by me following the design by Judy Serresseque; the basic wings can be purchased at OOAK Emporium and you can also download the tutorial there for creating these beautifully embellished wings. This was a time consuming and challenging project, but I had a blast.

So now that Libelle and Monika are finished, I moved on to finish my little polymer clay fairy. She is equivalent to an eight inch high sculpt. I have wanted to undertake an ambitious project like this one for a long time but the timing and inspiration was never right. She is a fairy sitting in an opened ostrich egg shell, with the insides of the shell adorned with ribbon embroidery. The doll herself also has a detachable silk ribbon embroidered train. The skirt lining and the folded ribbon rose are silk velvet that I hand dyed in shades of teal, olive, sage, and aqua. I used Fimo gel for the wings and embellished them with Pearlies. The ostrich egg took me a week to cut, and I had to use a flexible beading needle to achieve the ribbon embroidery on the concave surface. As of now I have covered the back (or the outside of the shell) first with paper clay then with modeling paste to cover the embroidery thread and ribbon ends and I am attempting to restore the outside so I can decorate it as well. The panels will then be re-hinged, the egg placed on a stand, and her pedestal made and then with a lot of help from Above she will be finished.

The tassel web site is getting ready to go. We will be in the video studio all day tomorrow, in between ostrich egg panel sanding.

Here are some photos of the progress of the doll, along with finished photos of Libelle. As with any project I create, I welcome "how'd you do that?" questions!

Cheers!